Thoracentesis
Peri-Procedural Management of Coagulopathy, Thrombocytopenia, & Antithrombotic Agents (last updated 01/2021)
Indications
Evaluation of etiology of new pleural effusion
Relief of dyspnea associated with large pleural effusion
Contraindications
Absolute
None
Relative
Platelet <50
INR/PTT greater than 2 times upper limit normal
Cellulitis or herpes zoster overlying needle insertion site
Mechanical or manual ventilation
Supplies - click here for printable list
Thoracentesis Tray with 8 Fr. Catheter and universal drainage set [contents]
Extra 60 mL syringe (2)
Cultures bottles for bedside innoculation
EDTA (purple top) tube
Red syringe caps (3)
Sterile gloves
Alcohol preps
Towels/ABD pads
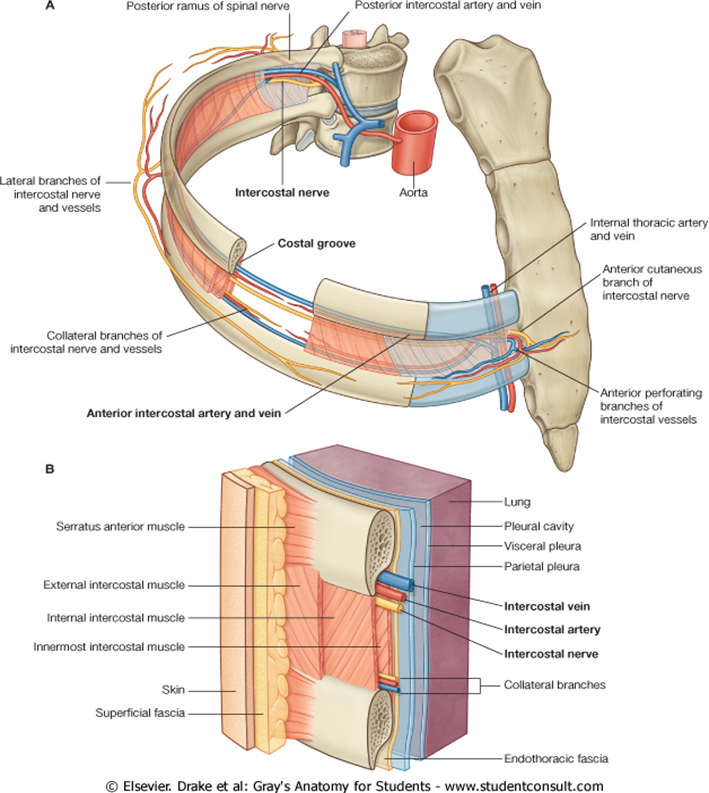
Anatomic Considerations
The visceral and parietal pleura are thin layers of connective tissue, and the space between the two linings is the pleural space. The pleural space extends inferiorly to level of approximately the 10th intercostal space. The intercostal vascular bundles are located along the inferior aspect of the ribs which is an important consideration during needle insertion due to the potential risk of injury to this bundle.
Technique
Informed consent
Informed consent including a description of the procedure, as well as the procedure risks, benefits, and alternatives should be obtained and documented, and a copy of the consent placed in the patient’s paper chart.
Patient and equipment preparation
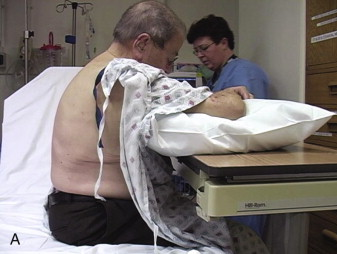
Position the patient sitting upright on the edge of the bed with arms extended. A table with pillow for the patient to lean upon is recommended in order to maximize comfort. The effusion should be localized using auscultation, percussion, and tactile fremitus. The thoracentesis site should be in the mid scapular or posterior axillary line (6-10 cm lateral to spine), and one to two intercostal spaces below the highest level of the effusion. In order to minimize potential injury of the diaphragm, the lowest recommended level for thoracentesis is between the eighth and ninth ribs (eighth intercostals space). Mark the area of needle insertion by pressing a pen or pen cap firmly on the skin creating an indentation that will remain after the ink is washed off.
Using sterile technique, the skin is prepped with antiseptic (Chlorhexadine) in a wide area around the thoracentesis site. A sterile drape should then be applied to create a sterile field.
Catheter insertion
Using a 16 gauge filtered needle, draw up 5 mL of 1% lidocaine without epinephrine into the 5 mL syringe. Exchange the 16 gauge needle for a 25 guage needle and raise of skin wheel at the upper edge of the rib just below the marked intercostal space.
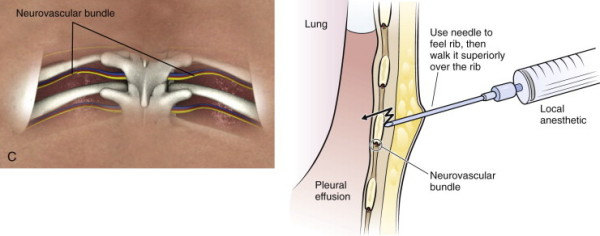
After a wheal is raised, exchange the 25 gauge needle for a 22 gauge needle to anesthetize the needle tract. Needle insertion should target the upper edge of the rib in order to avoid injury to the neurovascular bundle which runs at the inferior margin of each rib.
Advance the 22 gauge needle at an angle perpendicular to the skin, aiming for the mid to upper edge of the rib. For each 1 to 2 mm of needle advancement, aspirate, then inject 1 mL of anesthetic.
Once the needle is advanced to the depth of the rib, “walk” the needle superiorly until the intercostal space is reached, then advance the needle, under negative pressure, into the pleural space.
Upon entering the pleural space, there will be some resistance, followed by aspiration of pleural fluid into the syringe. Inject the remaining lidocaine into the pleural space, note the depth of needle insertion, and remove the needle under negative pressure.
Using the scalpel, nick the skin at the area of needle insertion, creating a 2-3 mm incision.
Utilizing identical technique, insert and advance the 8 Fr catheter over needle assembly, perpendicular to the skin and toward the upper edge of the rib, then walk the needle superiorly to the intercostal space. Then, under negative pressure, advance the needle into the pleural space, keeping in mind the depth of the pleural space as determined by the anesthetic needle. Once pleural fluid is returned in the syringe, advance the needle/catheter and additional 3-4 mm to ensure the catheter tip is inside the pleura.
Keeping the needle assembly stable, advance the catheter over the needle and into the pleural space.
Withdraw the needle, leaving the catheter in place. As the needle is removed from the catheter hub, the hub will lock automatically. Once the needle is removed, the hub cannot be unlocked and the needle cannot be reinserted. This is designed to prevent accidental air entry into the pleural space.
Attach the Y-tubing to the three way stopcock assembly on the catheter hub. The short arm of the Y goes to the 60 mL syringe, the long arm to the collection bag, and the neck to the catheter hub.
Open the stopcock by moving the valve to the open position and, using the 60 mL syringe, aspirate 60 mL of fluid. Remove the syringe and set aside to inoculate the culture tubes.
Attach the spare 60 mL syringe and aspirate to fill the collection bag. The tubing assembly contains a one way valve system that allows the operator to aspirate fluid into the syringe and then empty the syringe directly into the collection bag without reconfiguring the tubing.
Remove fluid by alternating pulling and pushing the syringe plunger until no additional fluid can be removed or a total of no more than 1,500 mL of fluid has been removed. Limiting fluid removal to 1,500 mL is advised in order to theoretically reduce the risk of re expansion pulmonary edema. Inform the patient that they may experience some chest discomfort and cough as the atelectatic lung re-expands with fluid removal.
When fluid removal is complete, close the stopcock to the patient, and instruct the patient to hum in order to generate positive intrathoracic pressure. While the patient hums, remove the catheter in a single, smooth movement and cover the entry site with a sterile bandage.
Innoculate bedside culture tubes and EDTA tubes, label all specimens, and place in specimen bags for transportation to the lab.
Post procedure considerations
Post procedure radiographs have historically been obtained in order to rule out significant pneumothorax, however, studies have shown this to be unnecessary in patients with low risk for adhesions, require only a single needle pass, and have no new symptoms during or after the procedure.
Results interpretation
Pleural fluid analysis
Diagnostic thoracentesis is useful for determining the cause of pleural effusions and for guiding therapeutic interventions. Visual inspection of the fluid is the first step in analysis and can help guide the differential and need for advanced therapies. Bloody fluid suggests trauma, malignancy, pulmonary infarct or pneumonia. White or milky fluid suggests presence of lipids. Grossly purulent fluid indicates empyema.
Pleural fluid studies should always include lactate dehydrogenase (LDH), total protein, cell count with differential, culture with gram stain, glucose, and pH testing. Concurrent serum LDH and protein levels should also be obtained. The first step in fluid analysis is to determine if the fluid is an exudates (protein rich) or transudate. This is accomplished using Light’s criteria. The presence of any of of the following suggests the effusion to be exudative in nature:
1.) Pleural fluid to serum protein ratio >0.5
2.) Pleural fluid LDH > two thirds of the upper limit of serum reference range
3.) Pleural fluid to serum LDH ratio >0.6
Transudative effusions are caused by increased capillary hydrostatic pressure as seen most commonly in congestive heart failure and cirrhosis. In general, transudative effusions typically require no further fluid analysis and therapy is directed at management of the underlying cause of effusion.
All exudative effusions should have additional pleural fluid studies including cell count with differential, glucose, pH, and cytology. Consideration should be given to checking pleural fluid triglyceride levels if there is concern for chylous effusion. The differential for exudates is broad, and includes trauma, malignancy, pneumonia, pulmonary infarction, connective tissue/autoimmune disease, tuberculous pleurisy, esophageal rupture, and pancreatitis.
Drainage of the exudative effusion may be necessary if certain conditions are met. In general, grossly purulent fluid on thoracentesis, a pH <7.2 or a glucose <60 mg/dL is an indication for drainage of the effusion. The American College of Chest Physicians published guidelines for the evaluation and management of parapneumonic effusions in 2000 which emphasized that the estimated risk for poor outcome should be the basis for determining whether a parapneumonic effusion should be drained. By the ACCP guidelines, category 3 and 4 parapneumonic effusions should undergo drainage, while category 1 and 2 effusions have lower risk for poor outcome and do not necessarily require drainage.

Recognizing & managing complications
Pneumothorax
Pneumothorax is the most common complication of thoracentesis, occurring in 5-20% of procedures. Typically, pneumothoraces are small and asymptomatic, and require no interventions. Occasionally, pneumothorax may result in increased respiratory symptoms and/or hypoxemia, and tube thoracostomy should be considered. Tension pneumothorax, presenting as hypoxemia, hemodynamic instability is a medical emergency, and should be managed with immediate needle decompression by inserting a large bore needle into the anterior 2nd intercostal space of the affected lung.
Cough
Cough resulting from re-expansion of atelectatic lung is a common complication of thoracentesis. Termination of the procedure due to cough is not required unless the patient experiences significant discomfort or if cough is severe and persistent.
Infection
Risk of iatrogenic infection is estimated at 2%. Attention to clinical signs and symptoms such as fever, leukocytosis, and respiratory signs and symptoms is recommended following thoracentesis.
References
Colice GL, Curtis A, Deslauriers J, et al. Medical and surgical treatment of parapneumonic effusions: an evidence-based guideline. Chest 2000; 118: 1158.
Roberts JR, Hedges JR. Clinical procedures in emergency medicine, 5th ed., (2004), 160-174.
Introduction to Inpatient Procedures: A Resident-to-Resident Guide.University of Minnesota Internal Medicine Residency AHCC Ambulatory Rotation. Second Edition, Revised October 2007 (available via www.mededportal.org)